Using pyDEA
Starting pyDEA
THIS SECTION MIGTH CHANGE IN THE FUTURE DEPENDING ON HOW WE DECIDE TO DEPLOY PyDEA.
This is the easiest way of running pyDEA on your computer and does not require the installation of any files.
Copy file DEApy.zip to a location on your computer and un-zip it.
Then browse to folder DEApy and find the file runNewGui.bat. Double
click this file and pyDEA should start (you may have to be a little
patient, especially the first time).
This will open the pyDEA main window, see Figure pyDEA solver main window. There are two parts in the pyDEA main window: the Data/Solution part and the Parameters/Weights Editor part.
In the Data/Solution part, under the Data tab is where you load the data (see Section Load Input Data File), select the inputs and outputs for the DEA model (see Section Selecting Inputs and Outputs) and under the Solution tab, the solution will be displayed after each run of pyDEA.
The Parameters tab under the Parameters/Weights Editor allows you to configure pyDEA (see Section Run) and the Weights Editor is for the more advanced usage of pyDEA which allows you to manipulate the weights of the inputs and outputs (see Section Advanced).
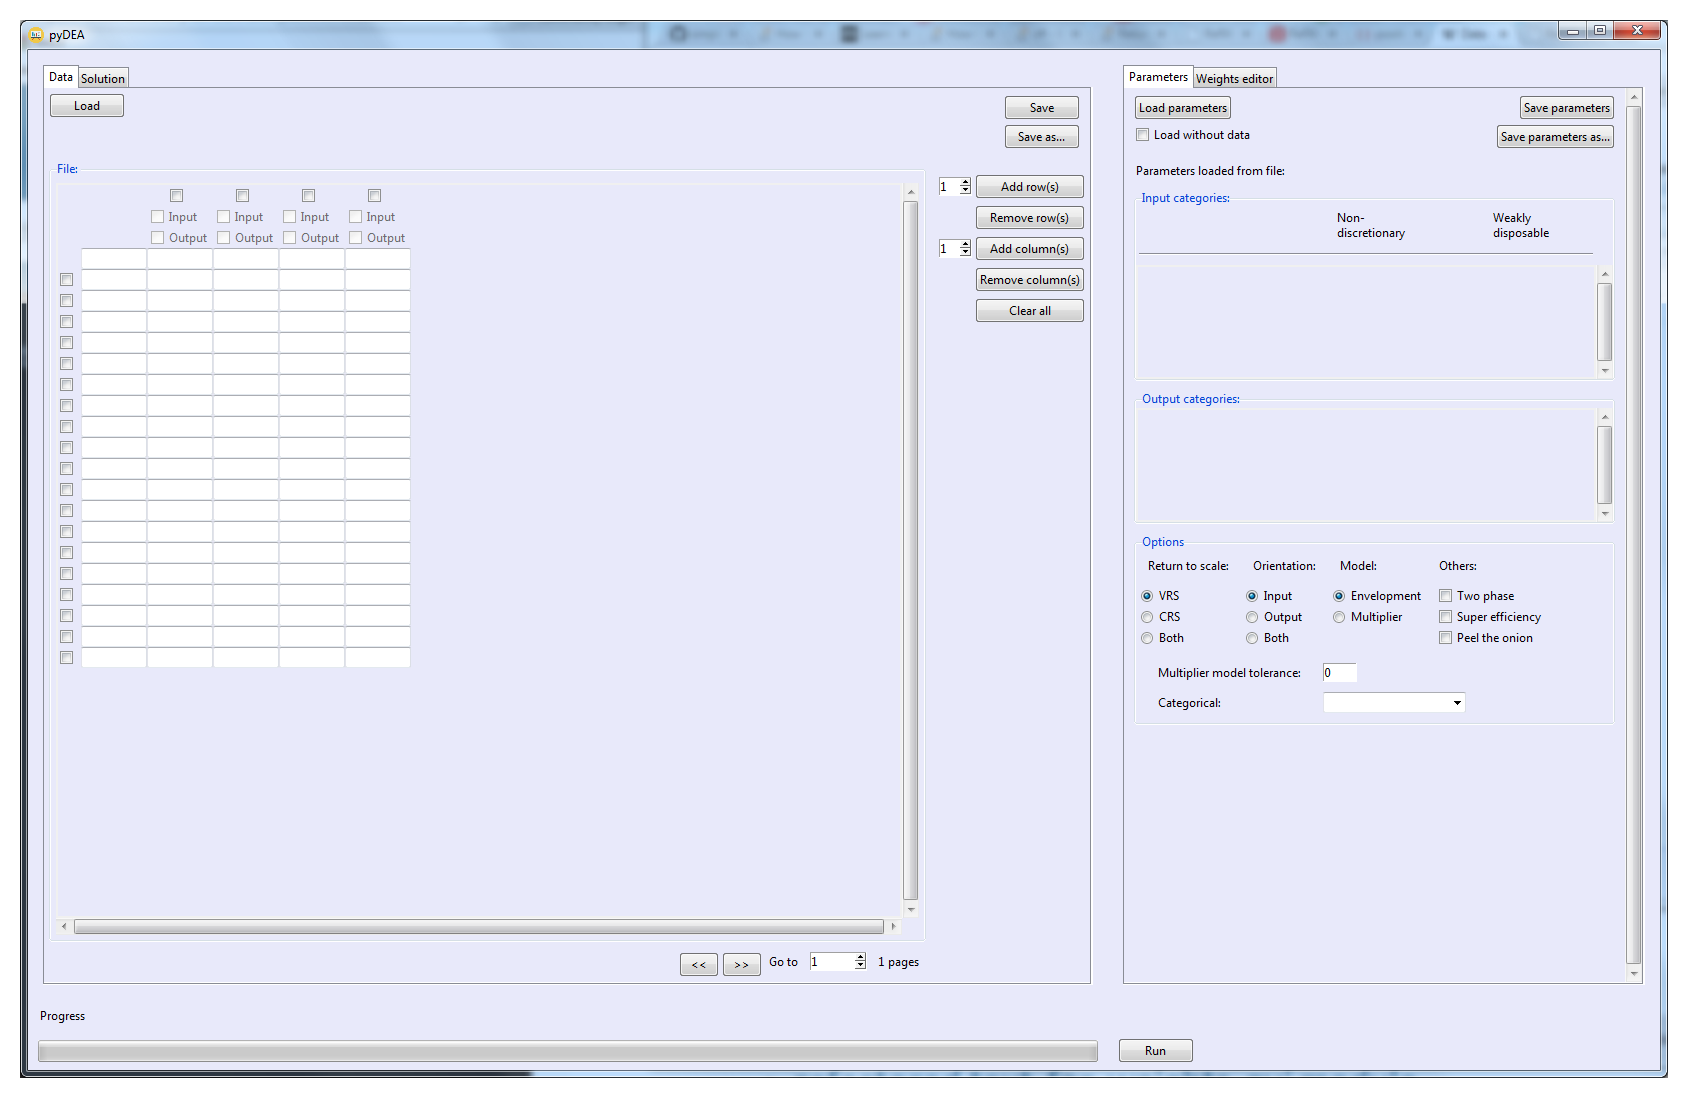
pyDEA solver main window
Note to University of Auckland students: Do not copy the files to your
Desktop as this may not work. Instead, copy them to your home drive
(could be echome or could be named after your upi) or save them
somewhere on the computer’s local file system.
Note that as you start pyDEA a minimised command window will appear in your task bar, see Figure Taskbar with pyDEA running and command window. This command window is shown in Figure Command window that opens whenever pyDEA is running. Do not close it as it that will also close pyDEA.
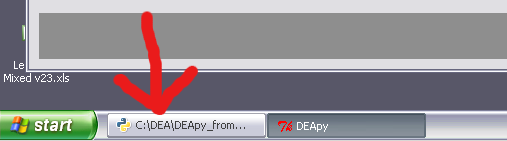
Taskbar with pyDEA running and command window
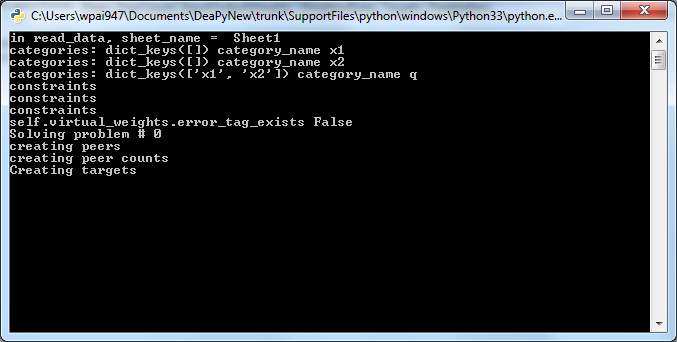
Command window that opens whenever pyDEA is running
What Are all those Files and Folders in DEApy
DEApy/Data/
Is the default location for reading input data files and storing pyDEA’s output result files. There are some small example files here that can be used to try pyDEA.
DEApy/source/
This folder contains all the program code. It is best to leave this as it is – most importantly don’t move it to a different location.
DEApy/SupportFiles/
This folder contains all the files that are needed for the program to run. Again, it is best to leave this as it is – most importantly don’t move it to a different location.
DEApy/runNewGui.bat
Allows to run pyDEA on Windows systems. Double click this file to start pyDEA.
Note that as you run pyDEA two types of files are generated.
*.mps– these are generated in running pyDEA and can safely be deleted after the pyDEA is finished.*.p– these are generated in running pyDEA and should be automatically deleted when pyDEA closes. If they are not deleted automatically they can safely be deleted after the pyDEA is finished.
Using pyDEA
Load Input Data File
To select the Excel (.xls or .xlsx) or CSV file that contains your input data, click Load. This will open a window to select the file and click Open, see Figure pyDEA file selection window. The default directory shown in the window is folder
../Data/
Browse to the location of your data file and select it.

pyDEA file selection window
Note that a .xls/.xlsx or .csv file must be selected, data cannot be read from other file formats. Also, data has to be in a very specific format, see Section Input Data for details.
After you have selected a file, you will be asked to select the worksheet containing the data you wish to analyse (this is for Excel file only - multiple worksheets in Excel file is now supported in pyDEA). By default, the first sheet is selected, see Figure pyDEA - Choose worksheet.
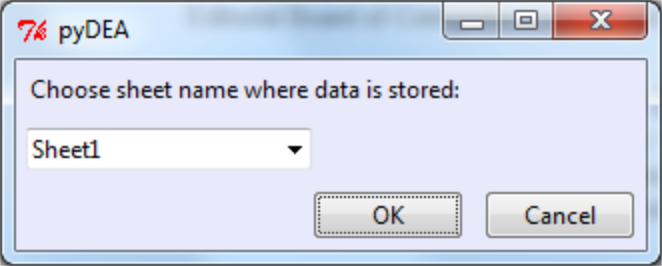
pyDEA - Choose worksheet
After you have clicked OK, the data is displayed in a spreadsheet style format with the selected filename displayed at the top, see Figure pyDEA variables in main window after loading data.
Note that pyDEA will not use any data columns that contain empty cells and such columns will be disabled (greyed out). Also note that DEA models are not capable of completing an analysis with negative numbers. Hence, all numbers must be non-negative and preferably strictly positive (no zero values). pyDEA disables data columns with negative value(s). the negative value(s) is(are) highlighted in red for users to address it. While zero values are not preferred and are highlighted in orange, pyDEA can still analyse the data with zero values, see Figure pyDEA variables in main window after loading data.
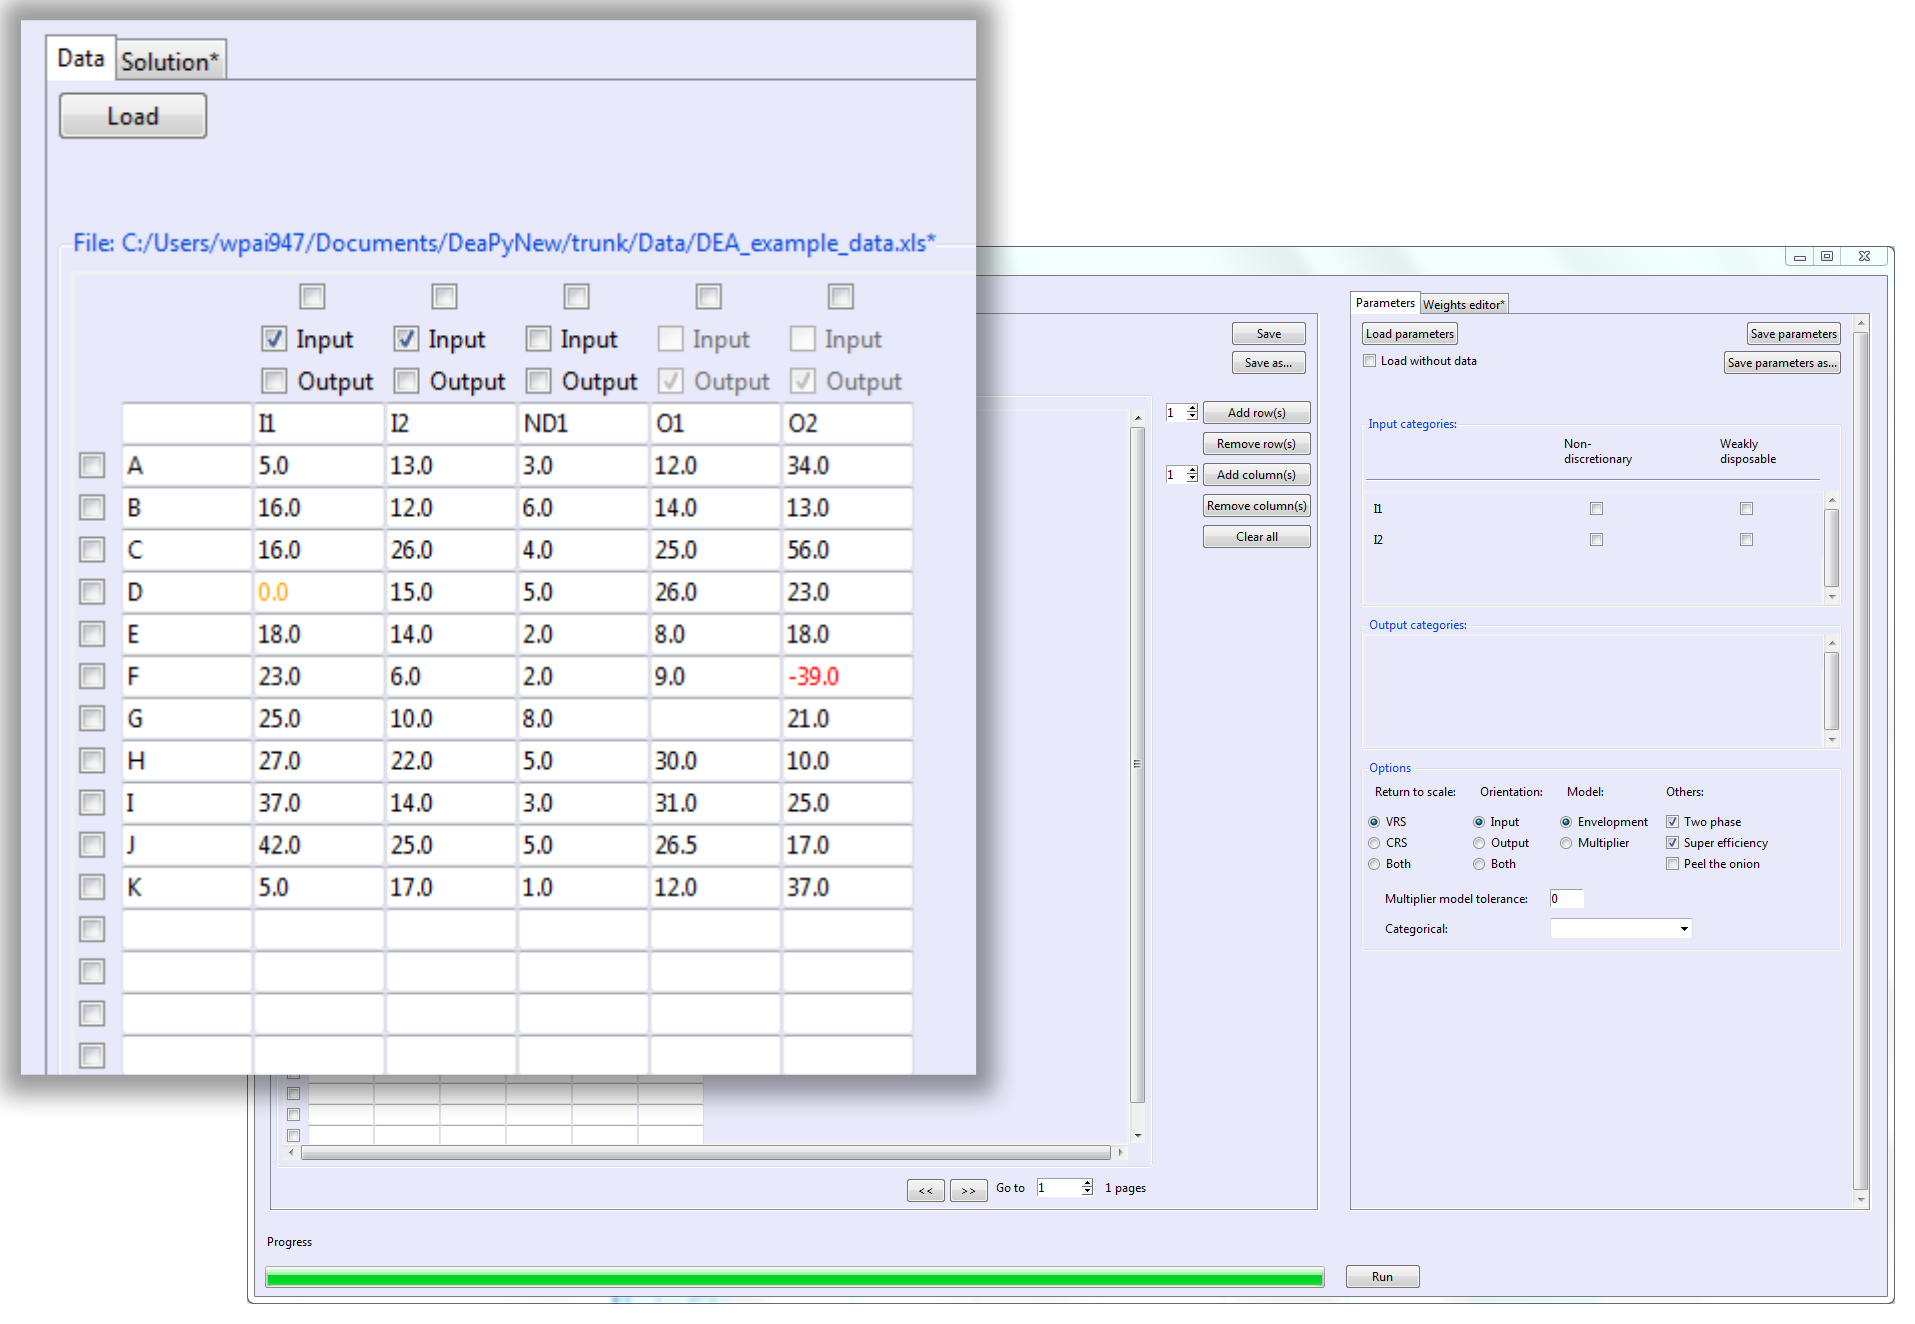
pyDEA variables in main window after loading data
Manipulating Loaded Data
You can add data for new DMUs (i.e. add new rows) or you can add new variables (i.e. add new columns) by simply adding to the empty rows/columns or if there is no empty row/column, then click on Add row(s)/Add column(s). Alternately, you can delete existing row(s)/column(s) of data by selecting the checkboxes on the left/top of the corresponding row(s)/column(s) and clicking on the Remove row(s)/Remove column(s). Clear all will remove all data. See Figure pyDEA - manipulating data.
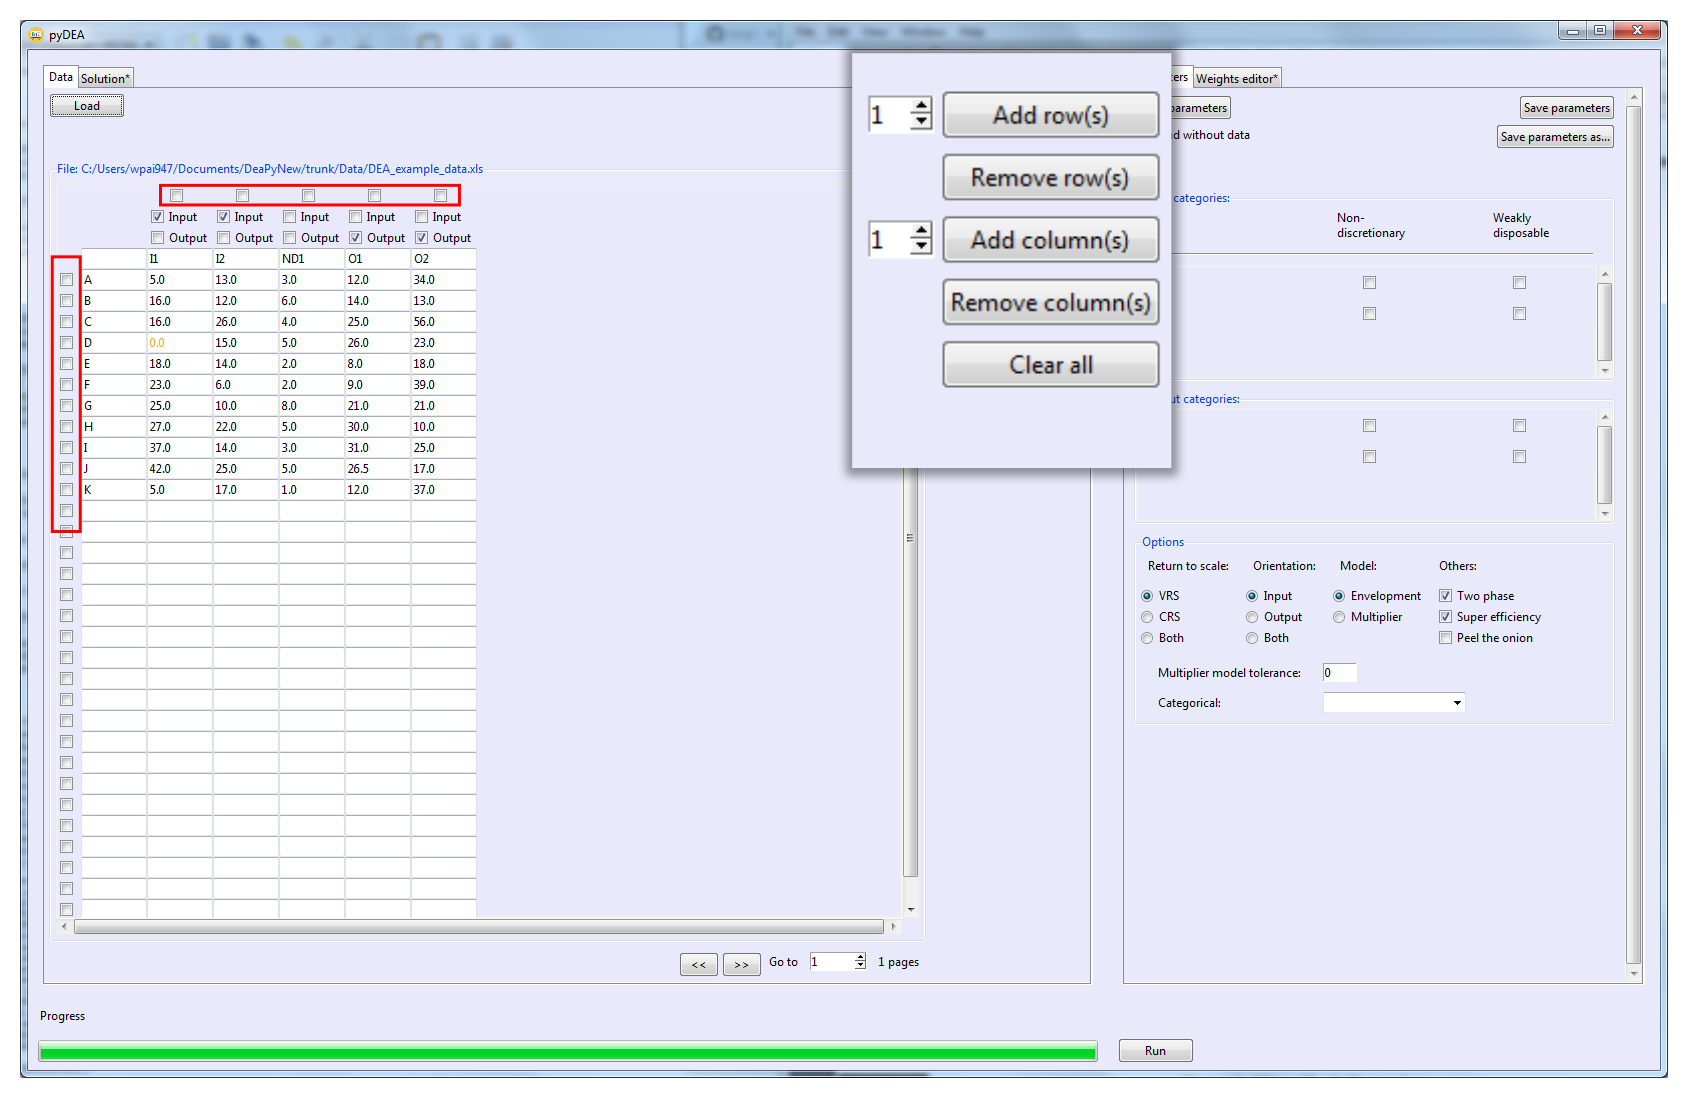
pyDEA - manipulating data
Selecting Inputs and Outputs
Selecting DEA Inputs and Outputs is done by selecting the Input or Output checkboxes above each data column. After the selection is done, you will see that the corresponding names of the selected data columns are added to the Input categories or Output categories respectively under the Parameters tab on the left part of the main window.
Similarly, names can be removed from the Input categories or Output categories by deselecting the Input or Output checkboxes above the conrresponding data columns.
Run
In order to run pyDEA, a few more parameters can be selected in the Parameters tab on the left part of the main window, see Figure pyDEA solver main window ready to run.

pyDEA solver main window ready to run
There are four different categories to configure pyDEA:
- Return to scale (RTS)
- VRS: Variable returns to scale model
- CRS: Constant returns to scale model
- Both: Selects both VRS and CRS model, that is pyDEA will run the analysis twice (once under VRS and once under CRS) and return a set of results for each run.
- Orientation
- Input: Input-orientation model
- Output: Output-orientation model
- Both: Selects both input and output model, that is pyDEA will run the analysis twice (once under input and once under output orientation) and return a set of results for each run.
- Model
- Envelopment Form: Model is formulated and solved in its envelopment form.
- Multiplier Form: Model is formulated and solved in its multiplier form. Tolerance can be set in the Multiplier model tolerance field.
- Others
- Two phase: A second phase model is run to maximise slacks. Note that this is only possible when the envelopment form is chosen.
- Super efficiency: Super efficiency model.
- Peel the onion: A tiered DEA model is run to layer and rank-order DMUs into a series of nested efficient-frontier layers.
One of each of the first three categories needs to be selected. Category 4 (Others) is optional.
There are also additional settings such as weight restrictions, categorical variables, weak disposability and non-discretionary variables that will be discussed later in Section Advanced.
Select Run … to run. Some parameters cannot be chosen in combination with each other, if that is the case, an error message should appear. Otherwise, pyDEA runs the DEA analysis. Progress is shown in the progress bar next to the Run … button.
When a run is finished, the Solution tab on the right part of the main window displays the obtained efficiency scores, see Figure pyDEA Solution tab displaying the efficiency score window after a successful run. Scores are given for all DMUs under all different run options. The figure shows an example where the analysis was run under VRS model and input orientation. You can also view other DEA results such as the Peer reference set, Targets, Weighted data etc.by clicking on the corresponding result tabs next to the EfficiencyScores tab. The filename of the data used in the analysis is displayed just above the efficiency scores. You can alternately click on the Data and Solution tabs to view the data and solution respectively. You can copy out partial results (e.g. just the efficiency scores) and paste into an Excel spreadsheet or simply close the window without saving the results.
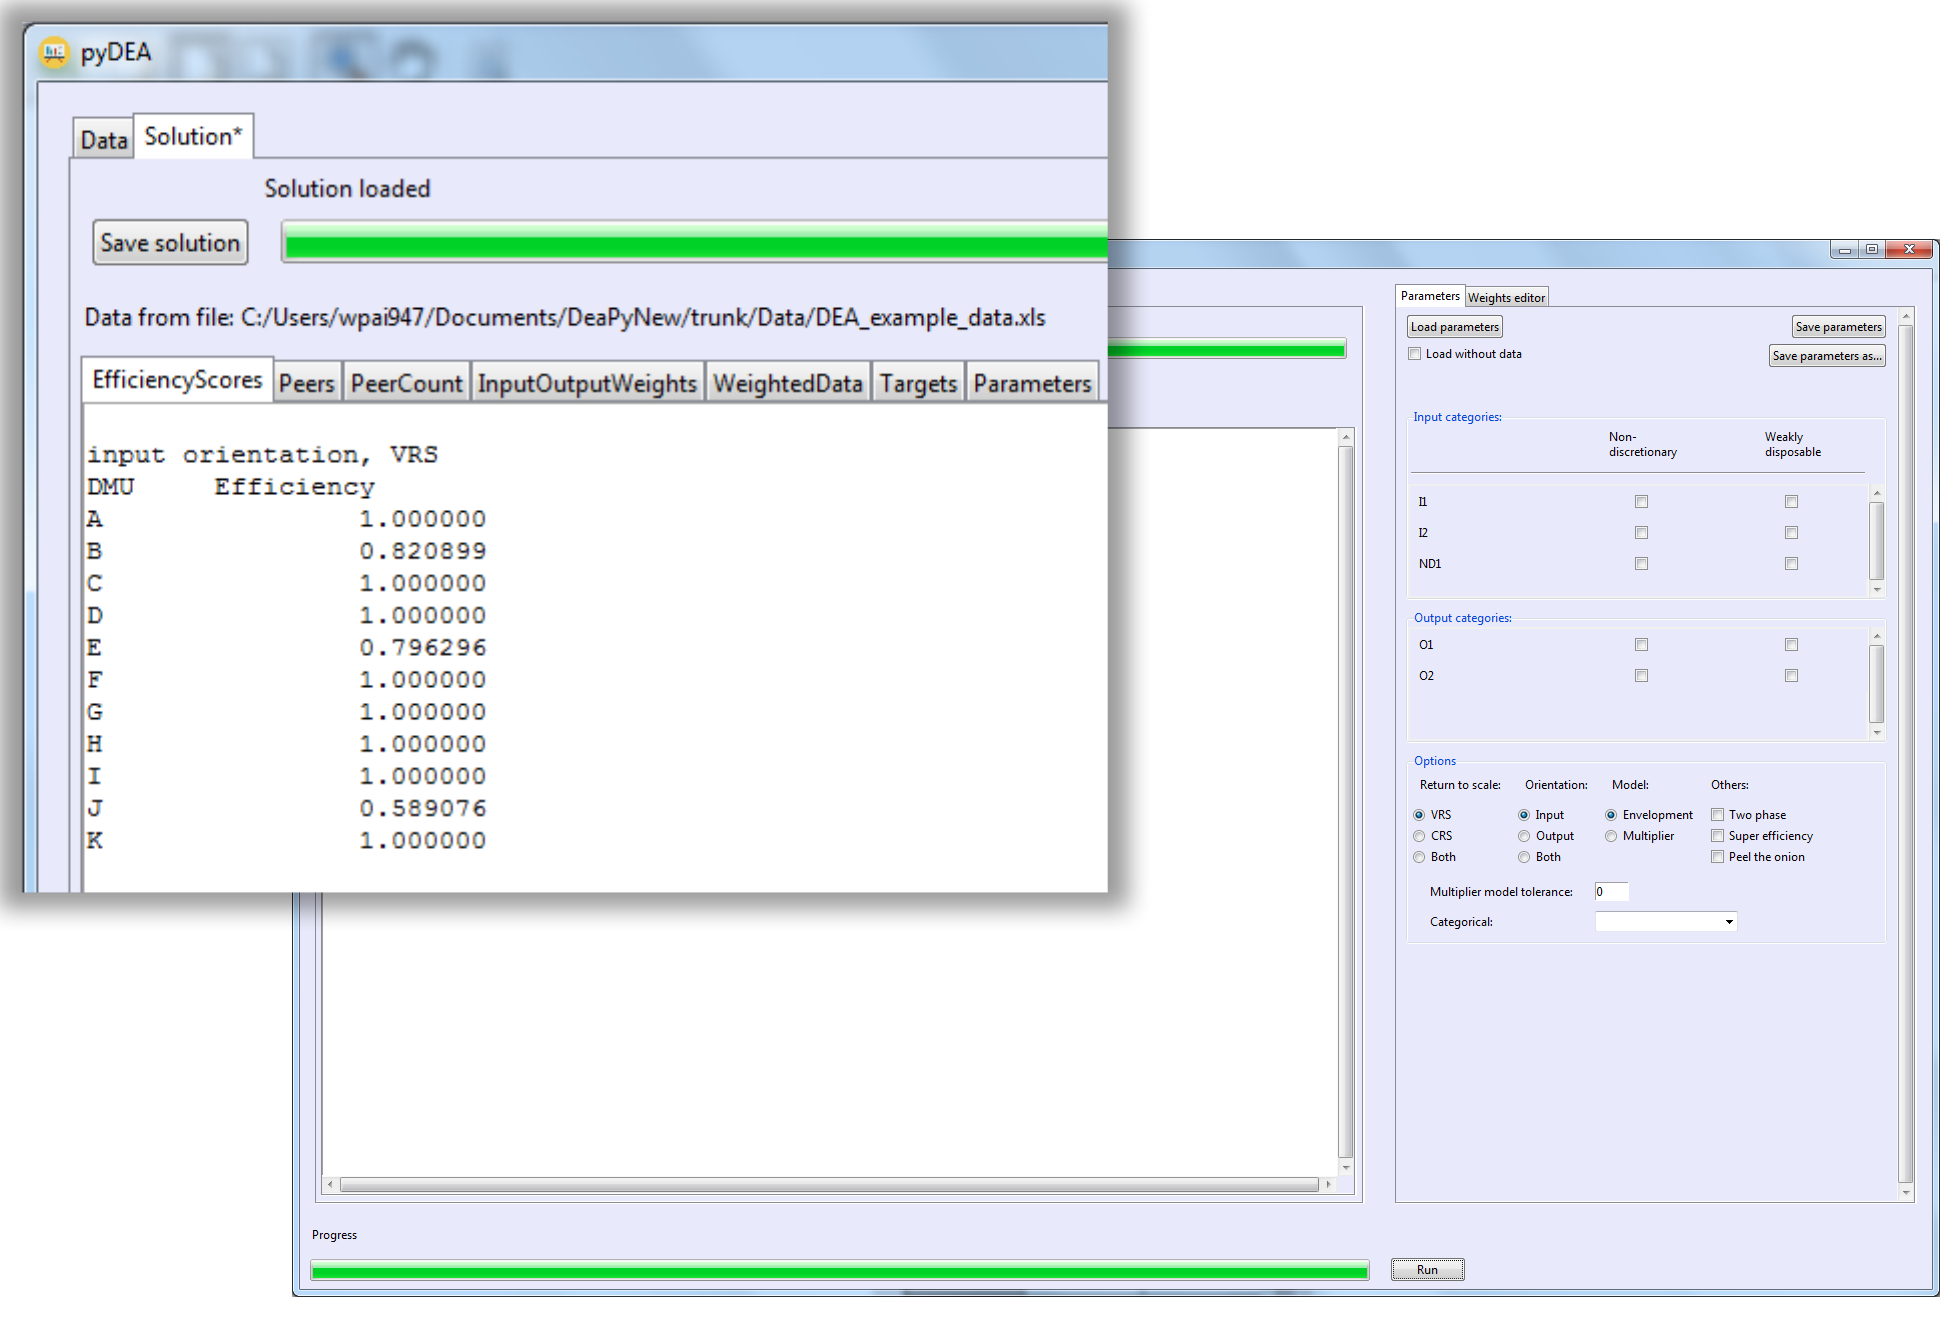
pyDEA Solution tab displaying the efficiency score window after a successful run
Note that running the analysis may take a while. This depends mainly on how many DMUs there are in your input file. The more DMUs, the longer the runtime. Also, when you select Both under RTS or orientation it will run multiple DEA analyses under the different settings, and hence runtime increases.
Saving Results
pyDEA gives you the option of saving results to Excel (xls/xlsx) and CSV formats. Just click on the Save solution button. Select the required format (Excel or CSV) and enter a suitable output filename e.g. inputFilename_results.xls. The complete set of results of the DEA run will be saved. The * in the Solution* tab will disappear upon successful save.
You can also save the parameters with the Save parameters button in the Parameters tab if you are mostly using the same DEA settings for your data.
Multiple Runs
Make as many DEA runs as you’d like.
Quit
There is no special button to quit pyDEA. Simply click the X button on the top right corner of the main window.
Advanced
There are further settings for DEA inputs and outputs. Some of them are available under Parameters and others under Weights Editor.
Non-discretionary and Disposability
When an input or output is selected in the Data tab, it is possible to make it weakly disposable or non-discretionary by selecting the corresponding option in the checkboxes in the Input and Output categories under the Parameters tab.
Categorical Variable
An input or output can also be a categorical variable. Variables (Data columns) that are not selected as an input or output can be set as a categorical variable. To set a variable as categorical, select the variable using the dropdown menu under in the Parameters tab. Figure Categorical option under Parameters tab shows the variables that can be selected as a categorical variable.
- Categories are represented by numbers. If they are not integers, values will be rounded to the nearest integer.
- A value of 1 represents the least favourable category, or in general: the smaller the number the less favourable the category.
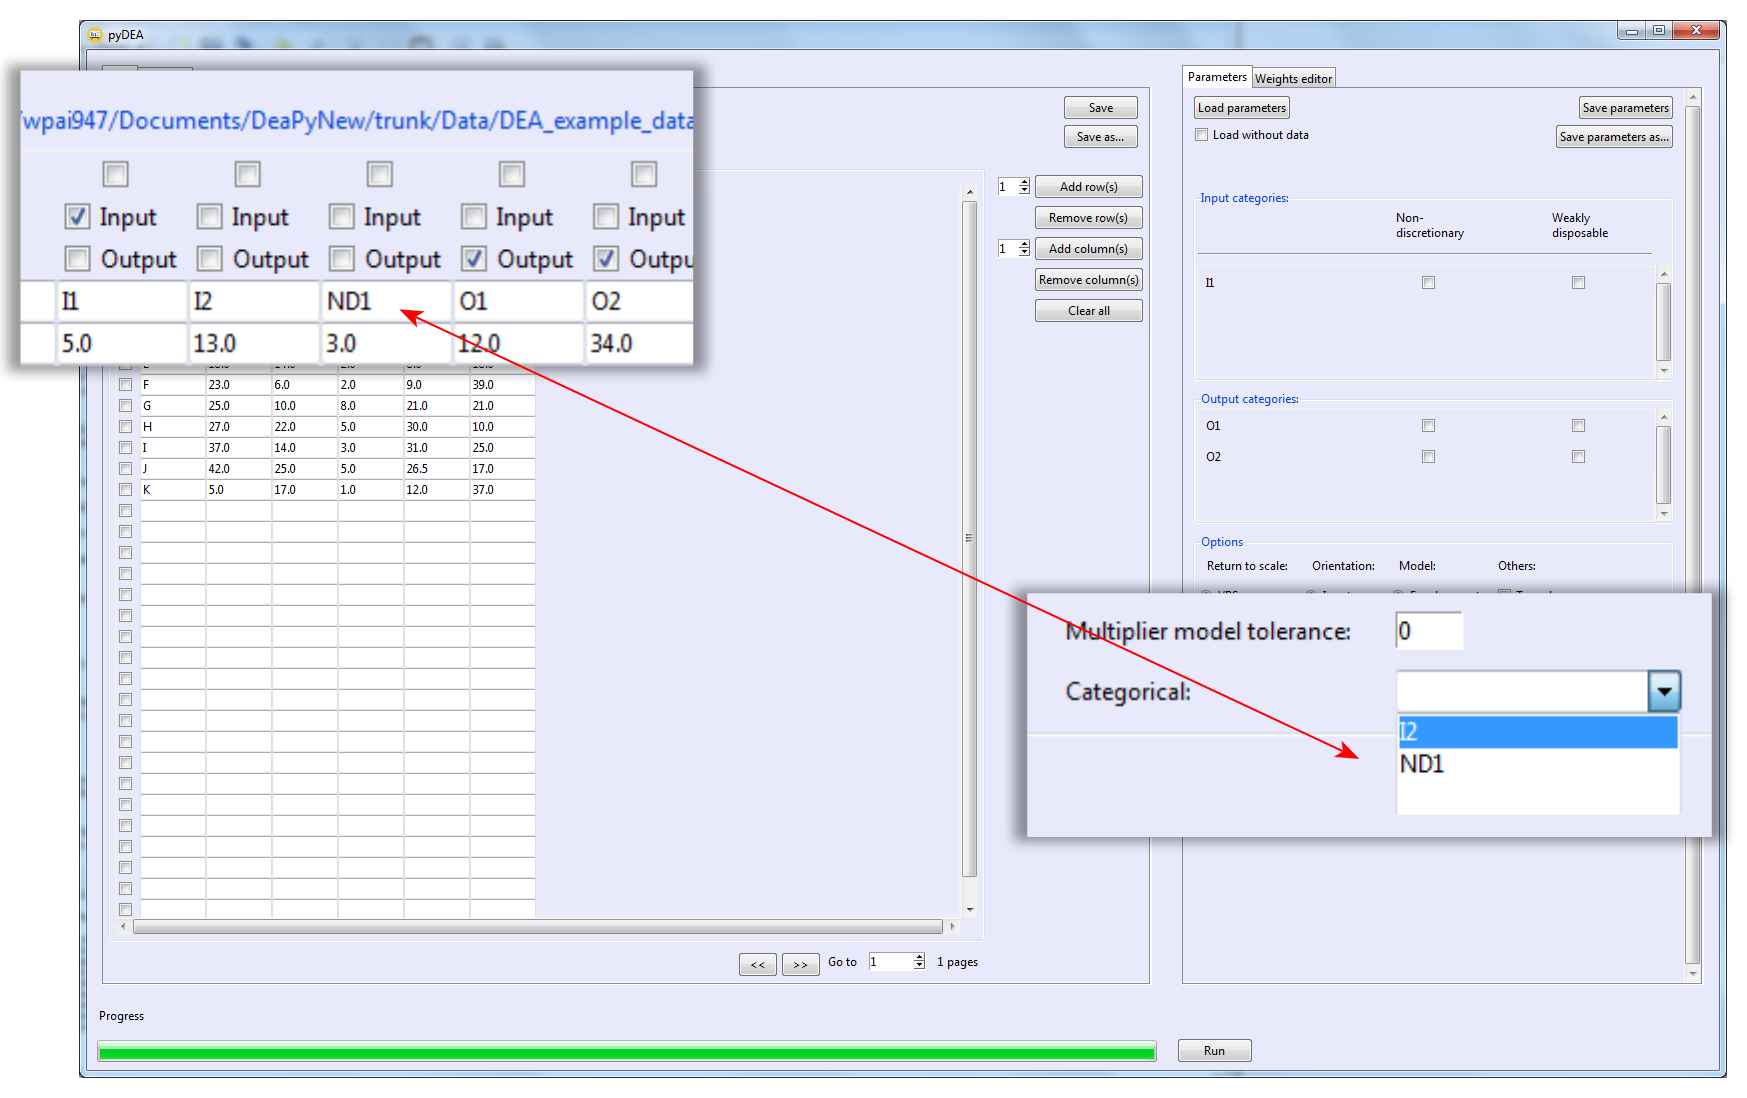
Categorical option under Parameters tab
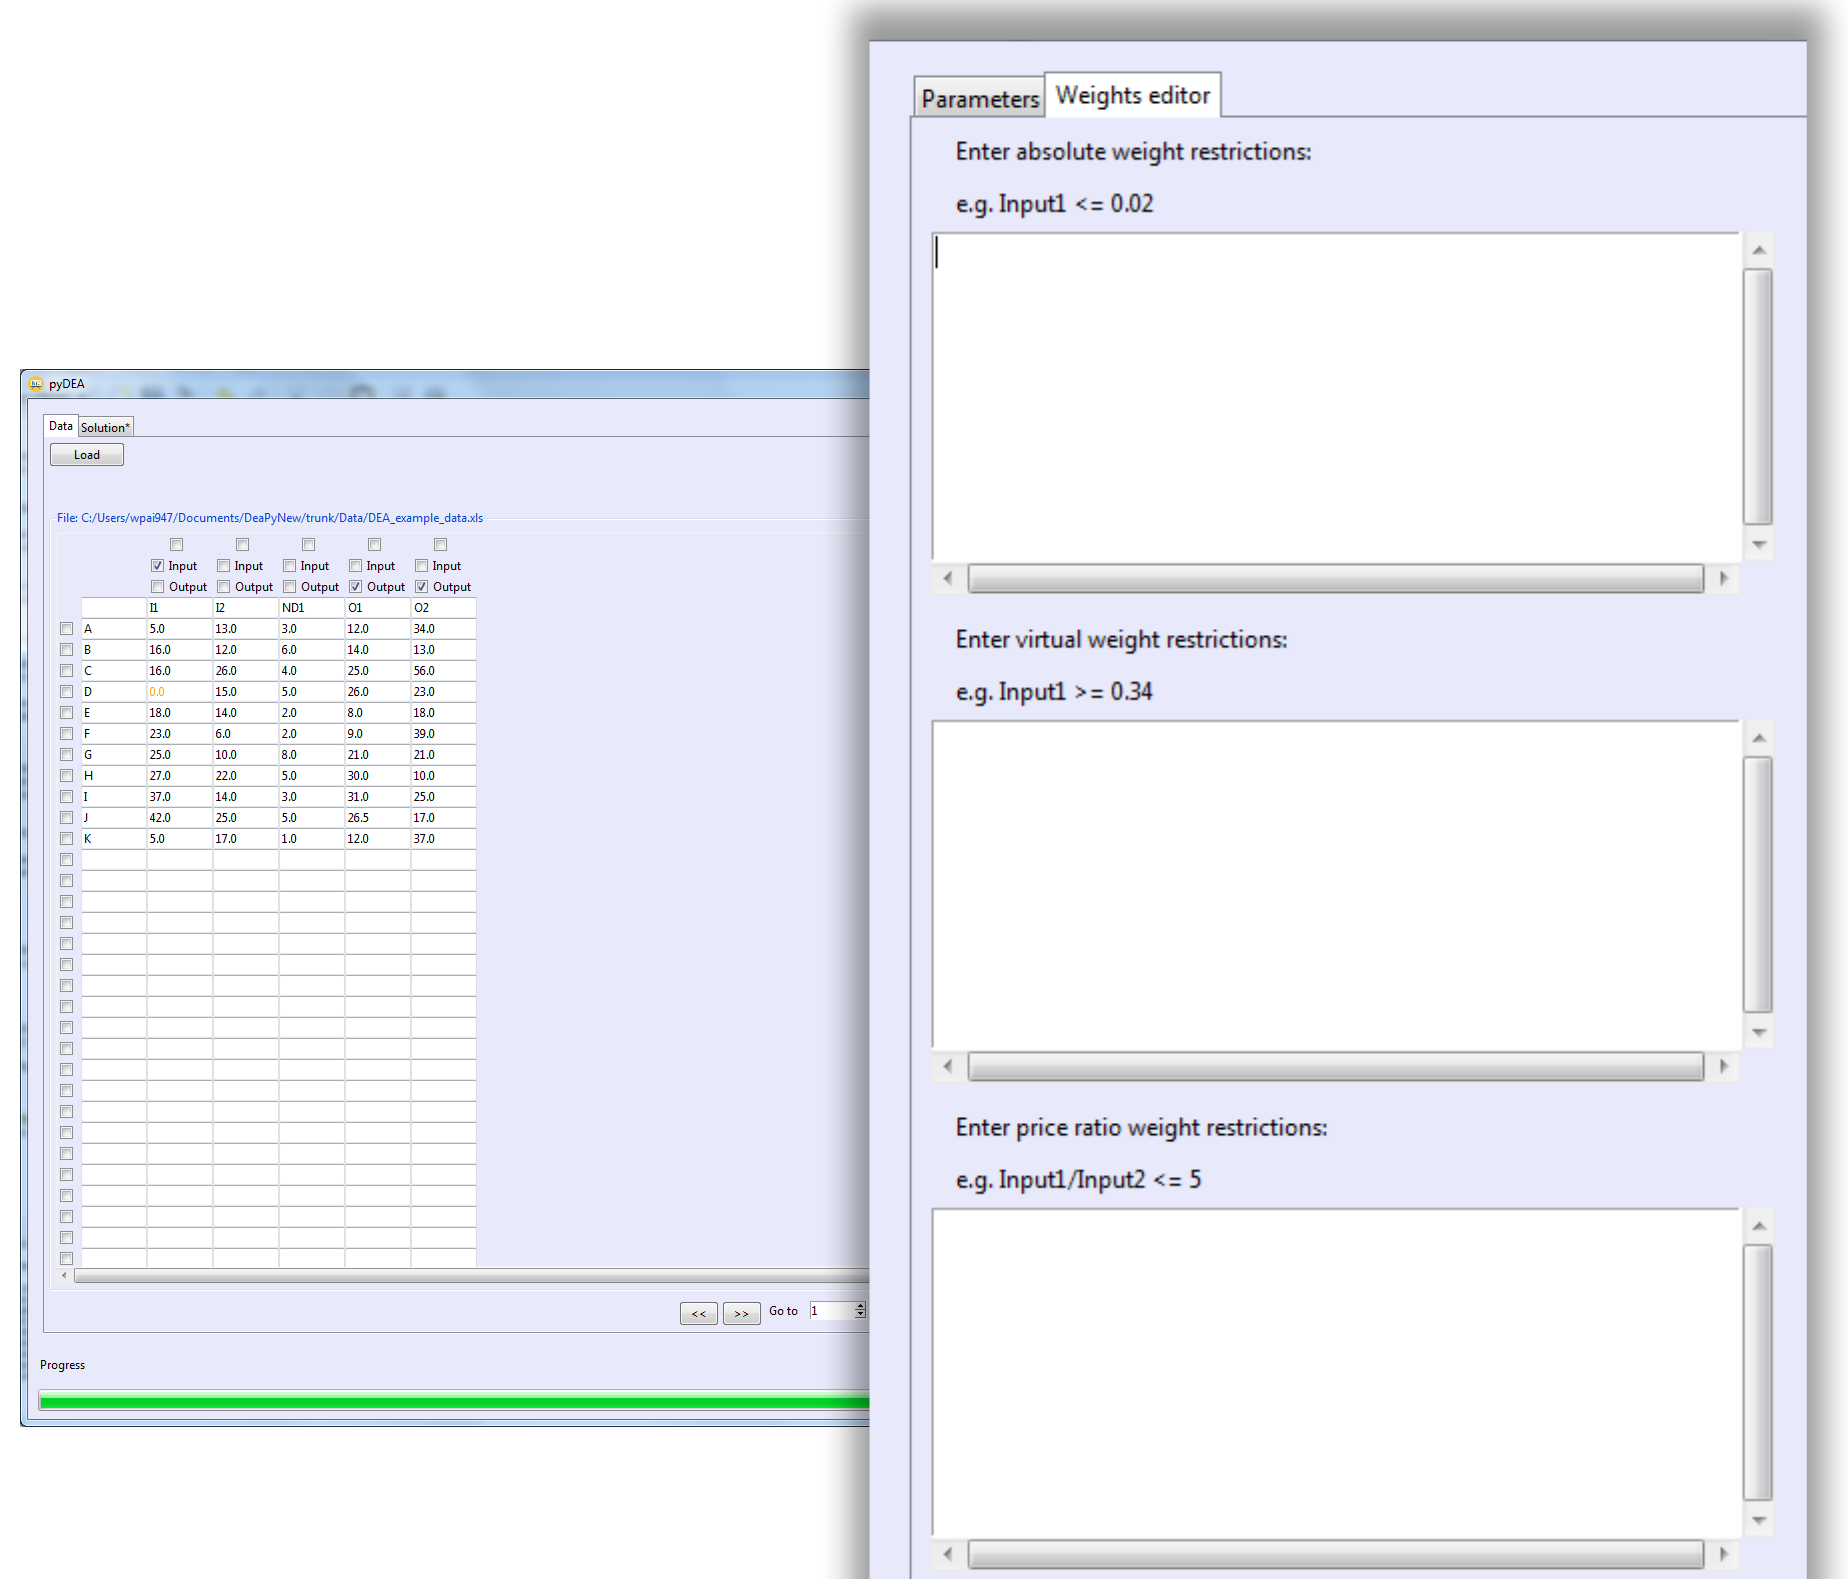
Weights editor tab

Validating weight restrictions
Weight Restrictions
Under Weights editor, weight restrictions can be entered. The Weights editor tab is shown in Figure Weights editor tab.
To show the weight editor, first click Weights editor tab on the top left part of the main window. There are three different types of weight restrictions: Absolute, virtual, and price ratio, see Figure Weights editor tab. Decide on the required type(s) of weight restrictions and enter the corresponding restriction(s) according to the format shown in the examples. Then click on Validate weight restriction. Validate weight restrictions does variable name and logic checks - it will give an error message when an undefined variable name or the wrong relational operator is used. Figure Validating weight restrictions shows a case of wrong operator entered and an error/warning message is given upon validating the weight restrictions.
Note that Validate weight restrictions does not check for conflicting weight restrictions. Hence, you might get infeasible solutions! If that happens and you have weight restrictions, carefully review those.
Application Colour
In order to change the background colour of the entire application, it is sufficient to modify constant bg_color in the file source/refactored/dea_utils.py. A new colour must be specified in hex format (default colour is #E8E9FA).
A Note of Warning
This is newly developped software and it may have some minor bugs. If there are any problems with the software, let Andrea know by sending an email to a.raith@auckland.ac.nz. Send command window output, name and version of your operating system, a screenshot of the solver window, the data file you used and any information you can about special settings (ideally save the parameter file and send it along), etc.